Porting a Toy Path Tracer to Swift
I ported a toy path tracer to Swift.
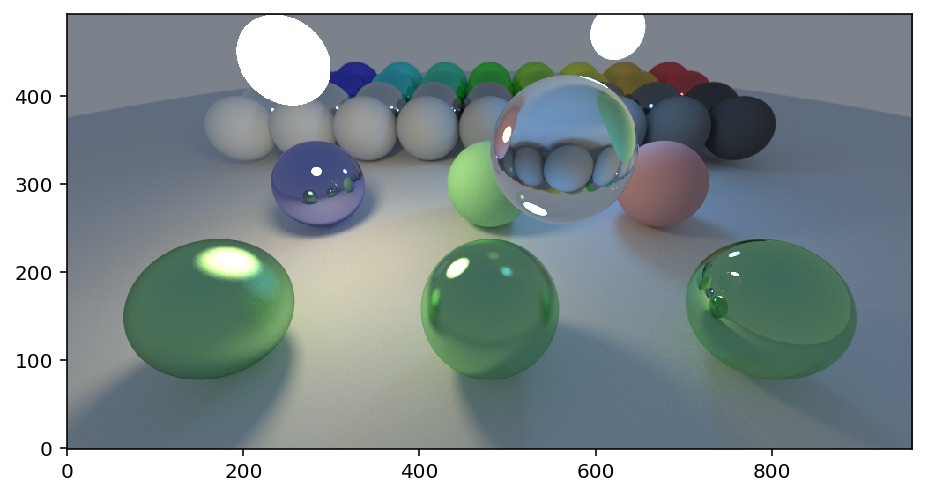
Some performance numbers:
| Environment | Mrays/s |
|---|---|
| Colab, effectively single threaded | 3 |
| iPhone 11 Pro Max | 18 |
| iPad Pro 12.9” 2018 | 21 |
| iMac Pro 2017 18-core | 96 |
I ported a toy path tracer to Swift.
Some performance numbers:
| Environment | Mrays/s |
|---|---|
| Colab, effectively single threaded | 3 |
| iPhone 11 Pro Max | 18 |
| iPad Pro 12.9” 2018 | 21 |
| iMac Pro 2017 18-core | 96 |
Some time around 1982, I saw an amazing comic on the wall of a Xerox Alto computer room at the MIT AI Lab. Given the subject matter, I assume the comic was originally created at Xerox PARC, possibly as part of the NoteTaker project, but can’t find any trace of it on the web. I have recreated it from memory, below.
The comic is explaining the events that happen when a Dynabook is accidentally dropped off the top of Half Dome in Yosemite National Park. Note that a free-fall calculator claims that it would take over 12 seconds for the Dynabook to hit the Yosemite Valley floor.

T+00.000 Dynabook accidentally dropped from top of Half Dome.
T+00.016 Dynabook notices that
Dynabook concludes that it is falling.
T+05.000 Dynabook hits a glancing blow to the side of Half Dome, breaking 3 of its 6 CPUs. The Dynabook reconfigures itself to continue working with the 3 remaining CPUs.
T+10.000 User data backup finishes.
T+11.000 Dynabook orders the user a replacement Dynabook.
T+12.000 Dynabook turns on an emergency locator beacon.
T+12.816 Dynabook smashes into the rocks at the bottom of Half Dome.
——–=====—–
I’ve been trying to decide which Apple laptop to buy for hobby programming.
I’m leaning towards the cheapest laptop Apple sells, the 2019 MacBook Air. As far as I can tell, is fine for my current needs.
I specced out a more powerful and future-proof laptop, a 2019 MacBook Pro with 2x the RAM and SSD storage, but it was 60% more expensive.
I think it makes more sense for me to buy the cheaper laptop today, and plan on replacing it sooner. Especially because I have a lot of family members who would be fine with the cheaper laptop as a hand-me-down.
It does feel a little weird to decide that I don’t need a “Pro” machine. When it comes down to it, Xcode, a SSD and a retina display are all the “Pro” I need for hobby programming, and Apple has made those features available in the budget Air line.
In the end I bought the more expensive Macbook Pro. I am a sucker. :-)
Writing these notes in case they help someone.
My daughter recently tried to add her Apple ID to her iPhone’sApple Messages app. (Settings > Messages > Send & Receive > Add Apple ID)
When she tried this, she got a dialog box where she could type in her Apple ID and password. After a 15 second delay she got an error dialog box:
iMessage Activation
  An error occurred during activation.
        Try again
She got a similar error message if she tried to activate FaceTime:
FaceTime Activation
  An error occurred during activation.
        Try again
I searched the Internet, and tried the various remedies that Apple and others suggested:
Having exhausted the home remedies, I contacted Apple Support by phone. Apple Support listened sympathetically, and ran me through the same steps, it roughly the same order. They also did a little bit of checking on their own of the Apple ID account to see if there were any issues.
They couldn’t find anything wrong, and they suggested that I contact my carrier.
I contacted my carrier, T-Mobile, and they ran me through the same steps as Apple. They also had me check out my phone’s ability to connect to the Internet for Data and SMS. They had me turn off my phone for a minute, so they could update my phone’s SIM. Unfortunately, nothing they tried helped.
In the end, what worked was to admit defeat. I had my daughter create a new Apple ID. She was able to use the new Apple ID to log into iMessage without any problem.
So far the drawback of this solution seem to be:
My guess is that the problem was on Apple’s end. The symptoms and cure seem to indicate that my daughter’s old Apple ID account was messed up in some small way, and Apple’s diagnostic systems were not detailed enough to detect or correct the issue.
So, anyway, I wrote this up to offer one more home remedy for people suffering from the “An error occurred during activation” message when trying to log in to iMessage. That message could have one of a number of different causes. If you are seeing it, please try the simpler remedies first, and please contact Apple Support (and your phone carrier’s support) for help. But if everything else fails, be aware that for some users such as my daughter, one solution was to switch to a new Apple ID.
After weeks of research and thought, I bought a iPad Pro 12.9” 3rd Generation.
My impressions, based on a week’s use:
FWIW I think for most people the ordinary 2018 iPad, with a Logitech Crayon, would be a better purchase.
But I do enjoy using it!
Botanicula is a whimsical graphical adventure game for the iPad and other computers. One of the puzzles near the end of the game requires a bit of thinking to solve. When I came upon it, after a couple of hours of play, I was too tired to think. So I wrote some code to brute-force the solution. I’m unreasonably pleased that it worked the first time. Here’s the code, cleaned up and commented:
// Solve the anemone Botanicula puzzle.
// Number the anenome 1 to 7, left-to-right.
// Encode a list of anemones into a single integer, where bit 0 is anemone 1, etc.
func encode(_ d:[Int])->Int {
	return d.reduce(0, {x, y in x | (1 << (y-1)) })
}

// A list of which anemones are pulled down when a given anemone is tapped.
let moves = [
	encode([5,7]), // Tap anemone 1
	encode([3,6]),
	encode([2,4]),
	encode([3,5]),
	encode([4,1]),
	encode([2]),
	encode([1]), // Tap anemone 7
]

// Calculate the effect of tapping a given anemone |m|.
func move(state: Int, tap m: Int)->Int {
	return (state | // original state
		encode([m])) & // raise the item that was tapped
		~moves[m-1] // lower the items that need to be lowered
}

// Brute force solver. Try all moves to depth |depth|.
func solve(state: Int, goal: Int, depth:Int) -> [Int]? {
	if state == goal {
		return [] // We've reached our goal, don't have to make any moves.
	}
	if depth <= 0 {
		return nil // Ran out of depth, give up.
	}
	for m in 1...7 {
		let newState = move(state:state, tap:m)
		if let soln = solve(state:newState, goal:goal, depth:depth-1) {
			// If we could solve the newState, prepend our move to that solution.
			return [m] + soln
		}
	}
	// Couldn't find a solution.
	return nil
}

// Produce the shortest solution, if one exists.
func tryToSolve(state:Int, goal:Int, depth:Int)-> [Int]? {
	// Do a breadth first search by searching successively deeper.
	for d in 0...depth {
		if let soln = solve(state:state, goal:goal, depth:d) {
			return soln
		}
	}
	return nil
}

let start = encode([1,6]) // This will vary depending upon the state of the puzzle.
let goal = encode([7]) // This is the desired state (just anenome 7 raised.)
let solution = tryToSolve(state:start, goal:goal, depth:12)

print(solution ?? "no solution found")
The Computer History Museum Oral Histories are a wonderful project. They are deep, long, interviews with many different programmers. Lots of never-before-made-public details about important projects.
For example, this oral history by Oral History of Kenneth Kocienda and Richard Williamson goes into details of how iOS was designed:


Or if you prefer PDFs:
One of the interesting things I found out was that there was an attempt to use HTML/Web APIs to write iPhone apps, and that for the first two or three iOS releases some of the apps, including the Stocks and Weather apps were implemented as HTML/Web apps.
I’m thinking of buying a new personal computer. I’m writing this essay to crystalize my thoughts on what to buy.
Why I don’t currently have a personal computer:
I must have bought twenty personal computers over the years, starting from an Exidy Sorcerer in 1978 and ending with a 13” Macbook Pro in 2013.
But since 2014 I’ve been without a personal computer of my own. The Macbook Pro’s been taken over by my son. I’ve got accounts on all my family’s computers, but when they’re all in use I’m reduced to using my work laptop.
My company has a “don’t use company resources for personal projects” policy. Since 2014 I’ve complied with this mostly by being too busy/lazy/distracted to do any personal projects. :-) But now that I’m helping my kids with their programming projects, it’s time to once again consider a personal computer.
Why not an iPad Pro?
I bought the original 12.9” iPad Pro and tried using it as a personal computer. It didn’t work out, because I like to program apps, and the iPad Pro doesn’t let you do much programming. And even if it did, the iPad Pro keyboard is not very good for typing.
The 2018 model iPad Pros have great hardware, including an improved keyboard, but they still don’t allow programming apps.
What’s my budget?
To put things in perspective, my first PC cost over $3,500 in current dollars, my first Mac was $7,000 in current dollars and my most expensive personal computer ever was a Macintosh IIfx at $20,000 in current dollars. I didn’t actually pay $20,000. I was an Apple employee at the time, and they had a “Loan to Own” program with extremely generous employee discounts. My most recent personal computer cost $1,650 in current dollars.
So, all things being equal, I’d say my budget is in the $500-$2,500 range. Perhaps more if there’s a really big benefit.
What do I want to do with it?
I don’t need a high end GPU. I’m not planning on using it for PC gaming or local machine learning.
Laptop or Desktop?
Over the past few years I’ve been living the laptop lifestyle at both work and home. I like being able to take my laptop on trips. Recently it’s been useful to take my laptop around the house to my different kids as I help them with their programming projects.
So for me I think the laptop portability outweighs the bigger screen and better price/performance of a desktop.
One use case: iPhone development. This typically requires the ability to charge, and debug a USB-attached device at the same time.
The case for an iMac Retina.
Recently I’ve been using an iMac Pro at work. I really enjoy:
That makes me think that maybe a iMac 5G might be a reasonable choice.
Hardware specs:
New or used?
I don’t mind used, but it needs to be new enough to run the current version of Xcode.
Upcoming changes:
Some possible configs
| Hardware | Price $ |
|---|---|
| iMac 5K 32GB/512GB (includes third party RAM upgrade) | 2400 |
| Macbook Pro 15 32/512 | 3000 |
| Macbook Pro 13 16/512 | 2200 |
| Macbook Air 13 8/512 (not retina) 1400 | |
| Hackintosh AMD 16/500 (reuse old monitor.) | 900 |
| Hackintosh laptop | 600-900 |
| Nothing, keep using current hardware. This is a good option during the school year. | 0 |
In the end I bought a 2019 Macbook Pro 13”. I sometimes regret the small screen, compared to an iMac, but I like the price and porability.
One of my daughters recently took the Girls Who Code iPhone App Development course.
This was a two-week summer course, taught 9 am to 4 pm in a high school computer science classroom. The first week the girls were taught the basics of the Swift programming language and iPhone App development. The second week the girls formed into 4-person teams and wrote their own iPhone apps.
The girls learned how to use modern software development tools like Stack Overflow, GitHub, and Trello.
Much of the instruction during the first week was by way of working through examples from a private Girls Who Code website.
What worked well:
What could have been better:
Overall I think this was a well run course, with good value for money. It would be appropriate for a high school girl who was already comfortable programming in Python or Java, and was looking to learn the basics of iOS programming.
A short update on my On the Cheap Machine Learning blog post. After almost a year of use, I’m still pretty happy with the setup. The hardware has worked well. I haven’t done as much independent ML research as I had hoped, but I have contributed many hours of night-time GPU cycles to the Leela Zero open-source Go-game-AI project. I don’t think I would change anything about the build, and there’s nothing about it I want to upgrade yet.
However, in the past year a new option has appeared for on-the-cheap machine learning: Google’s Colaboratory project. Colaboratory is a free web-based IDE for writing machine learning applications. What’s especially cool about it is that comes with access to a cloud-based GPU. The GPU they provide is the NVIDIA K80, which is not the fastest GPU, but it’s still plenty fast for experimenting with machine learning. [Disclosure: I work for Google, but not in any groups related to Google Colaboratory.]
Colaboratory puts machine learning within the reach of anyone with a modern web browser, even if that browser is on a device (like a laptop, tablet, or even phone) that doesn’t have a high-end GPU.
I find myself using Colaboratory instead of my own desktop computer simply because my son’s often using my desktop computer for schoolwork, YouTube and playing games.